

Understanding liver fluke
Knowing how liver fluke spreads can make it much easier to understand the risk on your own croft or farm. At recent Farm Advisory Service (FAS) events in Uist and Barra, Professor Philip Skuce and Gillian Mitchell from the Moredun Research Institute shared practical advice on liver fluke management, how to identify risk areas on your holding, and the options available for diagnosis and treatment.
Fluke life cycle
Understanding the liver fluke life cycle is the first step in managing the risk, as it explains how livestock become infected, why certain areas of land pose a greater threat than others, and when treatment is most effective.
Liver fluke is a highly pathogenic flatworm parasite Fasciola hepatica with a complicated life cycle requiring two hosts: mammals and snails. Liver fluke live in the bile ducts of sheep and cows, using suckers and spines to move around, which is what causes damage to the infected livestock. Whilst in the bile duct, the liver fluke produces eggs in vast quantities, that are then shed onto pastures through the mammal passing faeces. If the eggs are in water, they can hatch, releasing microscopic larvae called miracidia.
Miracidia have a short life span and must find a host within a few hours of hatching. Its host is a tiny mud snail. The miracidia then drill and burrow their way through the soft tissues of a mud snail, damaging but not killing it. Once inside the mud snail, they multiply and release, yet another microscopic larval stage called a cercaria, into the water.
The cercariae swim until they find a surface they can attach to, e.g. a blade of grass. Once on the grass, they then shed their tail and become a cyst. Sheep and cattle inadvertently eat the cysts when grazing.
Once inside a host sheep or cow, the natural digestive processes release the juvenile fluke from their cysts. The juvenile fluke uses its suckers and spines to make its way through the gut and liver to get to the bile duct, and the whole process starts again!
Philip and Gillian showed crofters a fascinating video created by David Barlow in conjunction with parasitologist Dr Clive Bennett - a great visual representation of the life cycle.
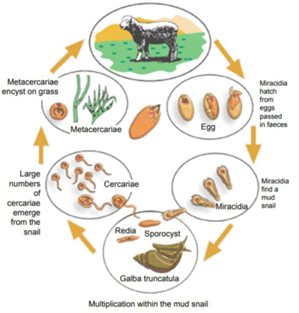
Figure 1 - Life cycle of Fasciola hepatica, FAS technical note TN677.
Identifying fluke risk on crofts and farms
Once you know the life cycle, the next step is to learn what we can do to identify fluke risk on our own crofts and farms.
Snails
Learning about what habitats the mud snails thrive in is a good way to identify the high fluke risk areas on our land. Mud snails can be thought of as the "Goldilocks" of the fluke life cycle, thriving only when conditions are just right. Their habitat needs to be wet, but not so wet that they’re completely underwater. They like bare mud, but not mud that has been recently disturbed. Mud snails also like open areas, so areas not covered by long vegetation, hedges or trees. They are also particular about pH, so they are less likely to be found in ground that is very alkaline or very acidic.
What can these perfect habitats look like?
- Depressions from tractor tyres, hoof prints, poaching and natural features of the land
- Cleared drainage ditches
- Banks on the sides of streams or ponds
- Soft, muddy ground around leaking pipes or water taps
Weather
Wet conditions and a mean temperature of above ~10°C are required for the environmental stages in the liver fluke cycle to take place. This means that disease risk is closely linked to experiencing a large amount of summer rainfall. Wet summers mean it is easier for miracidia to find mud snail hosts. In theory, this means peak cyst numbers on grass in the autumn. However, given the changes to climate, we can experience wetter warmer weather throughout the traditionally colder months, and therefore the risk of fluke and liver fluke disease now extends beyond the autumn.
Diagnostic options
There are several tests that can be done to diagnose liver fluke.
- Blood antibody Elisa – Measures acute disease risk through looking at antibody levels in a blood sample. Careful interpretation is required.
- Coproantigen Elisa – Can show mid to late-stage infection using individual dung samples.
- Fluke egg counts – Individual and pooled dung samples count fluke eggs and can show if you have an ADULT liver fluke infection. It is important to bear in mind that only adult fluke can lay eggs. If you have early or juvenile fluke this would not be picked up by a fluke egg count test, so retesting in four to eight weeks would be best practice.
- Postmortem – PMs of fallen stock or abattoir returns can show all stages of infection and indicate what might be happening in the wider flock or herd.
Fluke treatment options
Despite there being an array of products with different names available to buy to treat fluke, the number of active ingredients they contain is relatively limited. There are only four to five active ingredients available to treat fluke in the UK and knowing which active ingredient is in your bottle is very important. The ingredients can kill fluke of different ages so using them at the optimum time and the correct dose to avoid resistance is crucial. The ingredients for sheep are:
- Albendazole
- Oxyclozanide
- Closantel
- Triclabendazole (reports of resistance to this ingredient are increasing, so we need to be careful and only use it when we need it).
Table 2 shows the active ingredient, advised dose for both sheep and cattle (for recommendations for individual species, refer to SCOPS and COWS websites). The age of the fluke it can target as well as the guideline time of year to use it. Check those bottles!
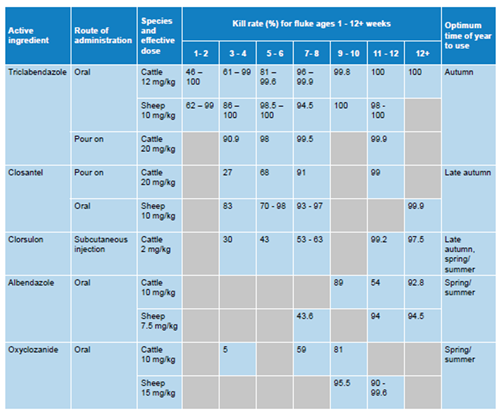
Table 2 - Adapted from Castro-Herminda et al, 2021 for FAS technical note TN677. Grey boxes show where there is no data currently available. Variations in product used, study design, and the presence of flukicide resistance
It is important to remember that none of the ingredients used to treat fluke are long acting, so livestock can become infected after treatment.
Five top tips
- Test before treating AND test after treating to check the treatments are working.
- Discuss alongside your farm vet a fluke control plan as part of your annual health planning review.
- Know what is in the bottle. Remember, right product for the right time of year and age of fluke. Check what ingredient is in the bottle before you use it. Speak to your local vet for advice.
- Understand local risk – What has the weather been like in your area and where have your stock been grazing: not all habitats are suitable for fluke.
- Talk to your neighbours. It is in everyone’s best interest (including the livestock and your wallet’s) to have everyone using fluke treatments as effectively as possible to optimise efficacy and reduce resistance risk.
Useful links
- www.moredun.org.uk/resources/videos/fight-the-fluke
- www.scops.org.uk/internal-parasites/liver-fluke/
- www.cattleparasites.org.uk/liver-fluke-and-rumen-fluke
- www.fas.scot/downloads/treatment-control-liver-fluke-fasciola-hepatica-sheep-cattle
Ashleigh Forster, Agricultural Consultant, [email protected]
Posted by SAC Consulting on 19/11/2026
